

Why the Stencil Looks Like a Target
The Stencil looks similar to a target but it is really a type of ruler. It has rings that start big and get smaller towards the center. The reason for the variety of rings is to evenly space your layers of prairie points. It also presents a choice in the finished size of the block or hot pad. The outer ring is 8'', with another ring every ½'', going down to 3½'' in the middle. The stencil will help you draw 90° and 45° lines perfectly across the whole circle if you need them, or draw small hash marks to mark specific points. The goal is to help you hit the bullseye with every folded star you make.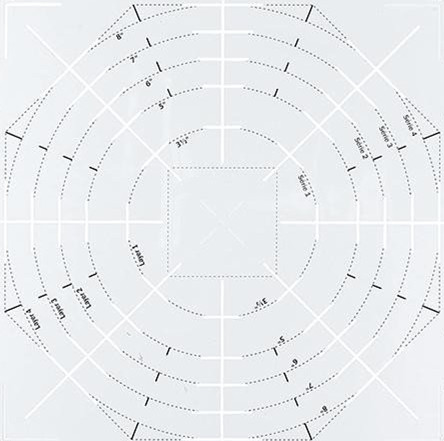 How to Use the Stencil
It is suggested that you practice using the stencil with plain paper before starting a block. It will help you become familiar with the way it works. Once comfortable with the technique, it is safe to go right to your first block.
A The stencil's short lines are like a little ledge to sit your prairie points on. These lines are perpendicular to the eight longer lines around the circle.
B The long lines indicate the center position of the prairie point. Every star block layer will need eight prairie points, which will sit on the short line, pointing toward the middle of the block.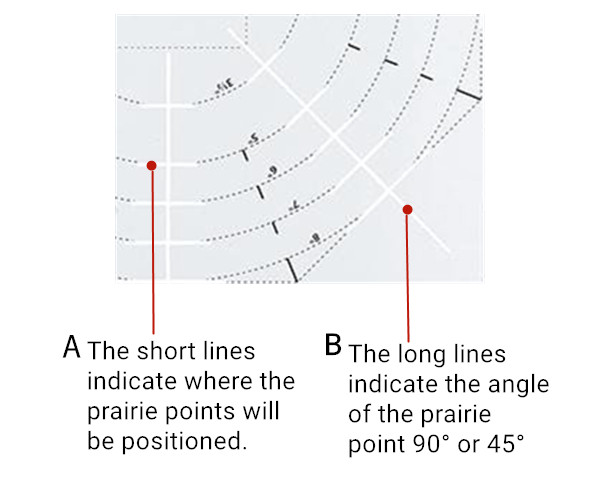
The rings are marked in inches, but the stencil also marks the layer order for making folded star hot pad pattern.
For sewers already familiar with this template, tracing your own foundation will be a snap.
Making an Easystar Block
 2 Trace & Place
 3 Sew & Go
Topstitch around the folded edge of the prairie points. Sew slowly. Use the needle down position, if available, to pivot at each corner and tip.
[OPTIONAL]
Adding Magic Corners
The prairie points form an octagon shape. To make the block into a square we need to add corners. Cut Magic Corner fabric in the same fabric as Prairie Points.
 THREE Easy projects you can make with the stencil
#1
EasyStar Pot Holder(finished size:8'')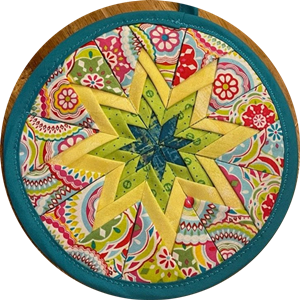 Materials:
Follow Steps 1 and 2 on the above page to make the block. You can leave it octagon or add magic corners to make it square, or trim it into a circle.
Once triangles are positioned on fabric, gently layer with batting and backing fabric. Move this carefully to the sewing machine. Top stitch around the star edge through all layers. Add additional quilting if desired.
Baste outer edge and trim excess fabric. Add binding.
Fabric and Cutting Guide
#2
Double EasyStar Pot Holder(finished size:8'')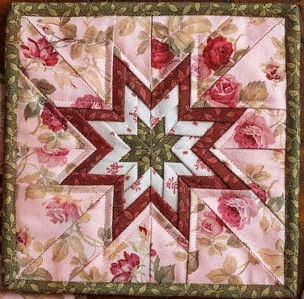 Materials:
 #3
#3
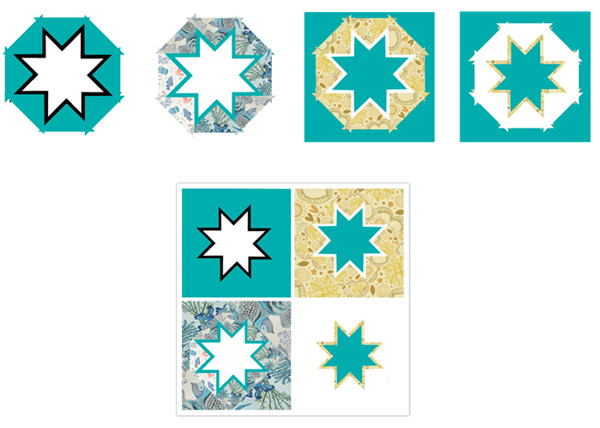
EasyStar Pillow(four 8'' finished blocks make this 18'' pillow) Materials:
The Stencil looks similar to a target but it is really a type of ruler. It has rings that start big and get smaller towards the center. The reason for the variety of rings is to evenly space your layers of prairie points. It also presents a choice in the finished size of the block or hot pad. The outer ring is 8'', with another ring every ½'', going down to 3½'' in the middle. The stencil will help you draw 90° and 45° lines perfectly across the whole circle if you need them, or draw small hash marks to mark specific points. The goal is to help you hit the bullseye with every folded star you make.
How to Use the StencilIt is suggested that you practice using the stencil with plain paper before starting a block. It will help you become familiar with the way it works. Once comfortable with the technique, it is safe to go right to your first block.
A The stencil's short lines are like a little ledge to sit your prairie points on. These lines are perpendicular to the eight longer lines around the circle.
B The long lines indicate the center position of the prairie point. Every star block layer will need eight prairie points, which will sit on the short line, pointing toward the middle of the block.
The rings are marked in inches, but the stencil also marks the layer order for making folded star hot pad pattern.
For sewers already familiar with this template, tracing your own foundation will be a snap.
Making an Easystar Block
- Make 8 Prairie Points
- Fold square in half; press.
- Fold one corner to the middle and press.
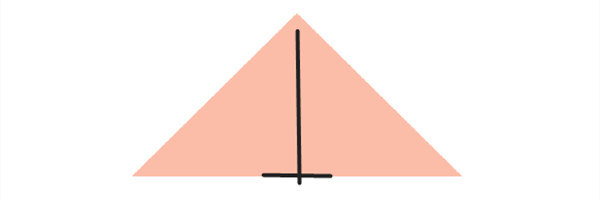
- Fold over the other side to form a triangle. Do not overlap the folds. The wide part of the triangle is the raw edge, the tip is the top. Repeat steps to make eight prairie points for each block. Use spray starch when ironing. You will use triangles center-fold side up.
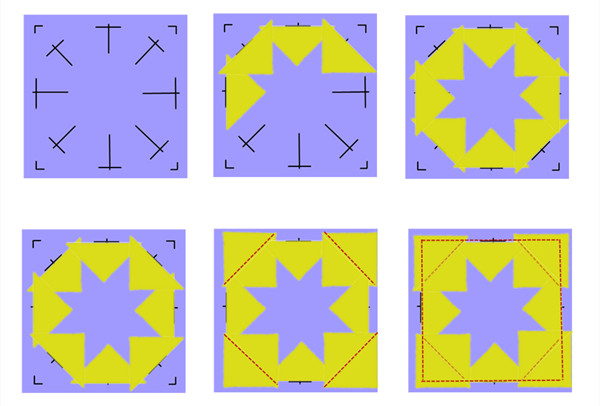
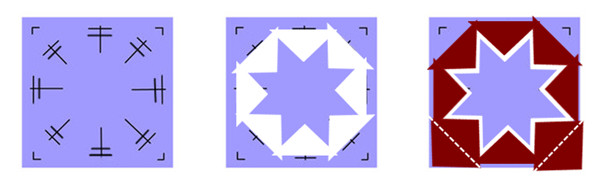
- Center the stencil over your background fabric. Draw the corner marks, then draw the "†" lines for the size block you're making. For example, if you are making an 8" block, use the 8'' ring.
- Do not draw stencil lines across the center of the fabric. Draw the "†" lines only long enough to position your prairie points. Stencil lines should not show beyond the fabric tip.
- With a dab of water-soluble glue on the backside, place prairie points one at a time onto the "†" positions. The raw edge of the triangle should be sitting on the base of the "†". When placed, the eight prairie points will create the star. Lay stencil on top of the star to check that it's perfectly aligned; adjust if needed.
Topstitch around the folded edge of the prairie points. Sew slowly. Use the needle down position, if available, to pivot at each corner and tip.
[OPTIONAL]
Adding Magic Corners
The prairie points form an octagon shape. To make the block into a square we need to add corners. Cut Magic Corner fabric in the same fabric as Prairie Points.
- Cut 4 squares 3½''. Draw a diagonal line on the wrong side of each square, in a light pencil or fabric marker that will not be visible from the right of the fabric.
- Lay a square in the block corner, so the diagonal line goes from edge to edge above the prairie point. Pin in place. Stitch across the diagonal line.
- Fold the square over to the right side, and press. Your corner is magically square. Repeat for each corner. Square up the block to 8''.
THREE Easy projects you can make with the stencil#1
EasyStar Pot Holder(finished size:8'')
- Eight 5'' squares for prairie points
- Four 3½'' squares
- 9'' Square for foundation fabric
- 9'' Square of cotton batting
- 9'' Square for backing fabric
- 2¼'' × 42'' Binding strip
Follow Steps 1 and 2 on the above page to make the block. You can leave it octagon or add magic corners to make it square, or trim it into a circle.
Once triangles are positioned on fabric, gently layer with batting and backing fabric. Move this carefully to the sewing machine. Top stitch around the star edge through all layers. Add additional quilting if desired.
Baste outer edge and trim excess fabric. Add binding.
Fabric and Cutting Guide
| star block size |
prairie point size |
prairie point yardage |
background& backing fabric |
magic corner size |
| 3½'' | 2'' | 2''×WOF | 5'' | 1.75'' |
| 5'' | 3½'' | 3½''×WOF | 6'' | 3'' |
| 6'' | 4'' | 4''×WOF | 7'' | 3.25'' |
| 7'' | 4½'' | 4½''×WOF | 8'' | 3.5'' |
| 8'' | 5'' | 5''×WOF | 9'' | 3.5'' |
#2
Double EasyStar Pot Holder(finished size:8'')
Materials:- Eight 5'' squares for prairie points - Layer 1
- Eight 5'' squares for prairie points - Layer 2
- Four 3½'' squares for magic corners to match Layer 2 if making a square hot pad.
- 9'' Square for the background fabric
- 9'' Square of cotton batting
- 9'' Square for backing fabric
- 2¼'' × 42'' Binding strip
- The first set of prairie points is positioned on the 7'' circle, the second set goes on the 8'' position. Each prairie point layer is glue basted before doing the next. This creates a two layer star.
- Once triangles are positioned on the fabric, add 3½'' magic corners, then press.
- Gently layer with batting and backing fabric, and top with block. More this carefully to the sewing machine. Top stitch around both layers. These will become double star quilting patterns on the back of the pot holder. Baste outer edge and trim excess fabric. Add binding.
EasyStar Pillow(four 8'' finished blocks make this 18'' pillow)
- 6 coordinated fat quarters
- ⅓ yard light solid for sashing
- Fat quarter of muslin for the back of pillow top
- ¼ Yard interfacing 20'' wide
- 2½ Yards piping(optional)
- 18'' Pillow form
- Batting 20''×20'' to quilt the top
- Make four Double EasyStar Blocks. Mix and match fabrics to create a scrappy look. Do not top stitch block yet. Add magic corners, then square each block to 8''.
- For sashing fabric, add light interfacing to stabilize the fabric. There is a difference in the thickness and interfacing will help fabric wear evenly.
- Add 1½'' sashing to blocks, then sew together per diagram. Sew 1½'' outer borders to pillow top.
- Layer pillow top with batting and a layer of muslin and quilt by top stitching the stars along the star edges. Stitch-in-the-ditch the rest of the seams. Square up. Add piping all around if desired, using a zipper foot.
- For the pillow back, use a fat quarter and line the fabric. Pin this to pieced top and sew around the pillow, following piping line. Leave a 14'' opening on one side for stuffing(inserting pillow form). Turn EasyStar pillow inside out, stuff with a pillow form, and close opening by hand sewing. TIP: clips are great to hold the seams closed until stitched.